
Kirigami - a form of art that requires a certain degree of perseverance from the master. Even working according to a special template, it is necessary to strictly follow the proportions and recommendations. You can make something original with ordinary scissors and paper at hand. Paper can be colored or plain, the finished product will not become less impressive from this. Literally translating the word kirigami from Japanese means “cut paper”. Compared with other types of needlework, this one has been born relatively recently. It was first mentioned in the 1980th year.
What it is?
Nobody can tell the exact date when exactly the art of Kirigami appeared, but the peak of its popularity falls on the 80s of the twentieth century. In common people, this art began to be called paper architecture. In order for the technique to become perfect and, in order to achieve real mastery in reproducing various products, the beginner or master will have to constantly practice.
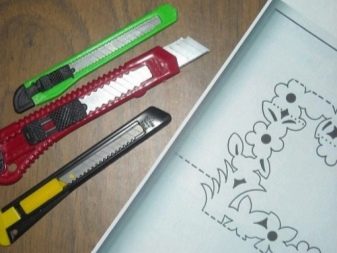
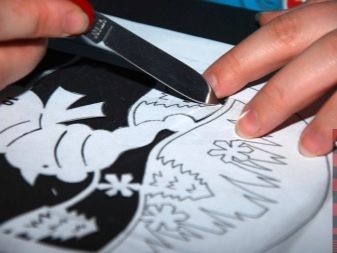
First, a specific template is selected, after which the details are cut. You can cut it out from a separate sheet of paper, or from several. To obtain volume fragments or the whole figure, you will need to expand the sheet. In the process, you will need to attract a fair amount of imagination and, accordingly, a set of tools. In addition to ordinary scissors, small stationery knives that are different in shape and size can also be suitable for work.
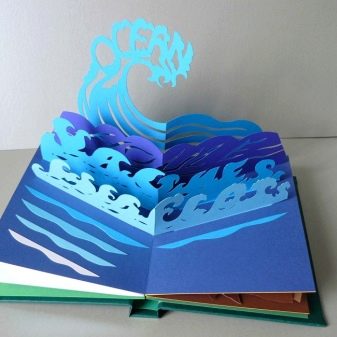
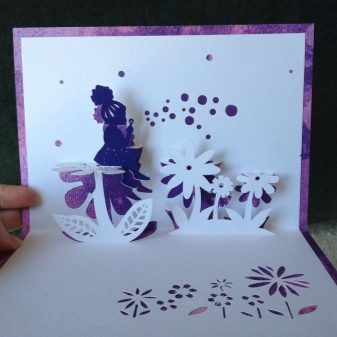
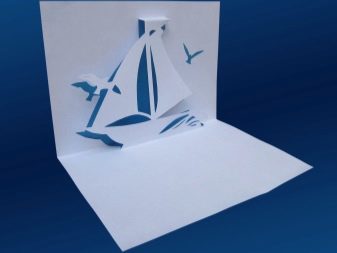
Kirigami can be seen, for example, in popular folding children's books. All this is created manually, and paper figures originally and graphically recreate scenes from history. Turning pages creates a sense of true storytelling dynamics.And bright colors and careful study only enhance perception. Postcards where figures can be collected separately and inserted into specially cut fields also belong to the Kirigami industry.
They do not deteriorate when handled carefully, and when unfolded, they easily form a visual picture.
History of Origin
Now the Kirigami has become a branch of paper architecture, and it originated in Japan, at the end of the last century. Only in the very beginning of the 80s thousands of different schemes and models were created. This art has become the basis for the production of modern two-dimensional and three-dimensional cards. Master Masahiro Chatani was able to perpetuate his name in history, creating a fundamentally new direction in needlework. Two-dimensional and three-dimensional architectural models of different colors, greeting souvenirs and reproduction of production models from paper became possible thanks to the appearance of Kirigami. In this case, various materials and tools are used.
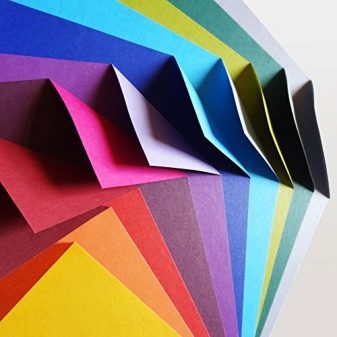
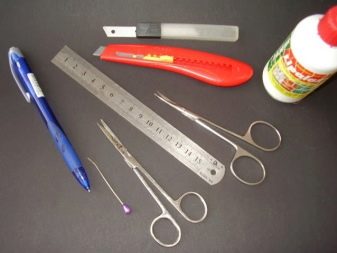
- Cardboard or thin enough colored papernot exceeding a density of 120 grams per square meter. This paper is easy to find in the office. As for the required sizes, this is specified depending on the chosen scheme. The paper sheet folds in half after transferring a diagram or drawing onto it.
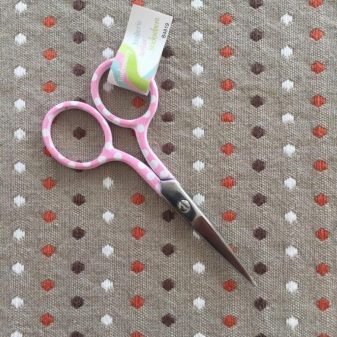
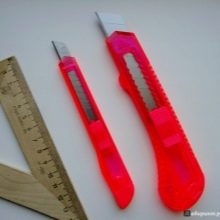
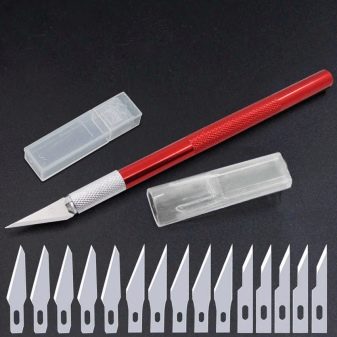
- Little handmade scissors. They can be purchased at a special store. The main condition is sharp tips and a thin blade, and those that are usually used when embroidering are also suitable.
Depending on the complexity of the chosen idea, the working technique also changes. For example, with a solid drawing, the paper will need to be pierced a little. To avoid “misfires” and sharp edges, the tips of the scissors are not brought to the end during operation, and the workpiece itself is constantly rotated. Sometimes the list of necessary tools, depending on the scheme, may include:
- stationery knives of various shapes and sizes;
- special needlework knife for working with small fragments;
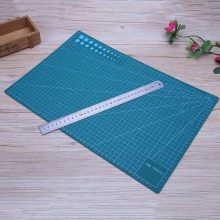
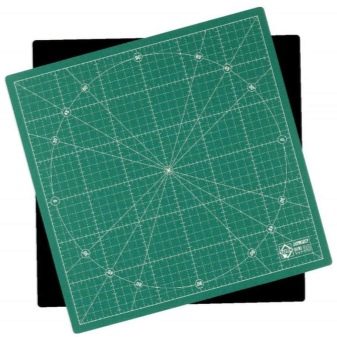
- rubber mat for fixing crafts during work;
- paper clips (sold complete with rugs);
- special spatula for smoothing paper;
- a metal ruler and a simple pencil to indicate the markup;
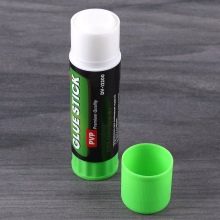
- persistent adhesive stick, not leaving marks after drying.
Species overview
Kirigami has several directions, as in any branch of art.
- Jenigami, which is based on the use of three-dimensional figures. They are prepared separately and stored folded. No glue required to create.
- Origami - products from several paper sheets. The technique is based on the fact that the paper folds in a unique way, forming the necessary shape.
Cutting or aligning small parts in this case is not necessary.
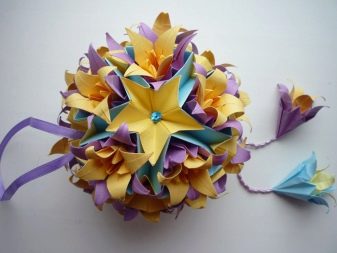
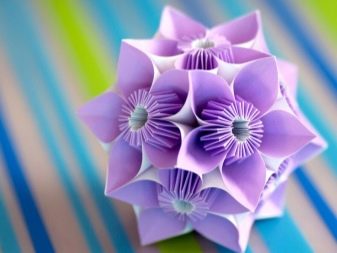
- Kusudam - a direction derived from origami, more complex. It is thanks to this technique that paper bouquets or compositions are subsequently collected. In complex products, special threads or glue are sometimes used.
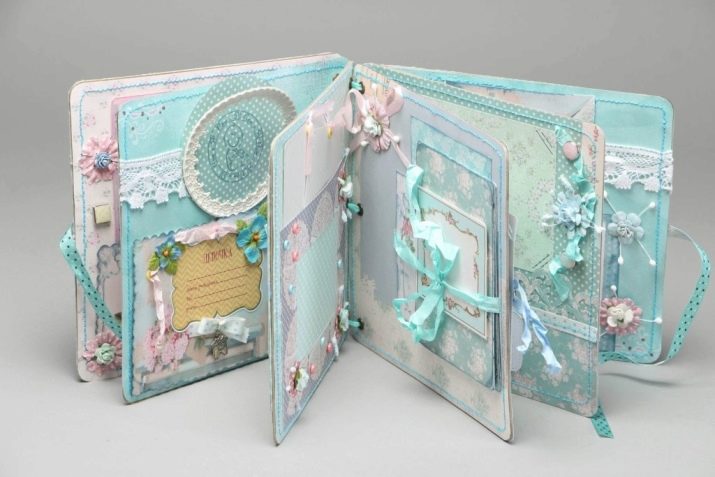
- Scrapbooking - The art of making albums or diaries from paper. The basis may even serve as old magazines or newspaper clippings.
When choosing a specific template or scheme for playback, you can rely on a number of tips. For example, solid lines in the diagram indicate the direction of the cut. The dotted line is the fold of product lines inward, and several dotted points are the direction of the fold outward. In the manufacture of the master will require patience and perseverance. Do not be upset if something does not work out the first time, the most important advice is to act "from simple to complex."
Flat
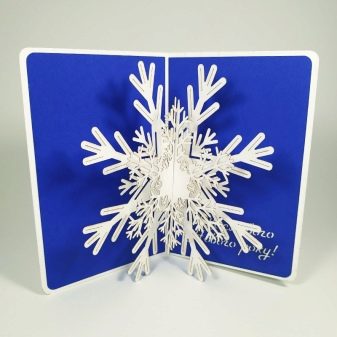
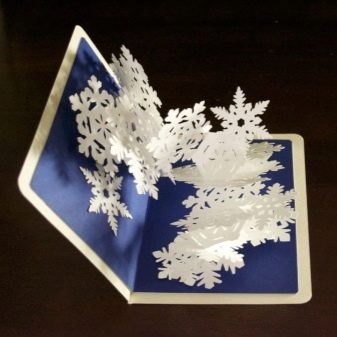
Flat Kirigami is a separate art form, the main part of the work in which is the preparation of the image itself. It usually abounds with many small details and complex patterns. A plain background and bright, contrasting colors are used for playback. The most striking example is the manufacture of traditional flat New Year's snowflakes from paper.In many cities, this is the same indispensable decoration on the windows, as well as bright garlands.
Volumetric
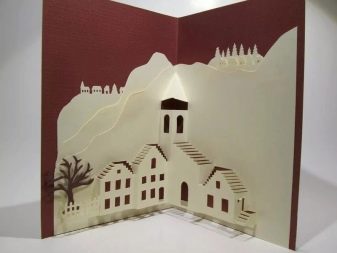
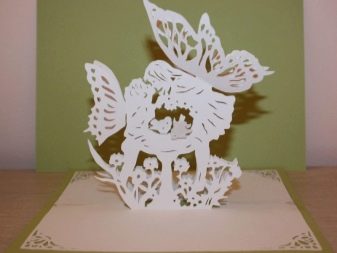
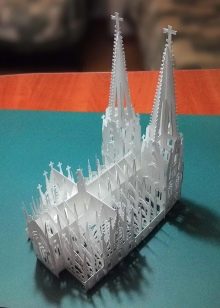
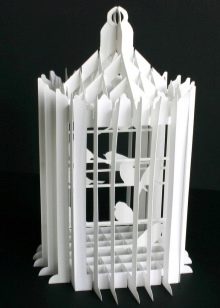
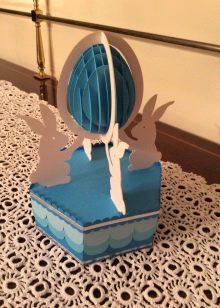
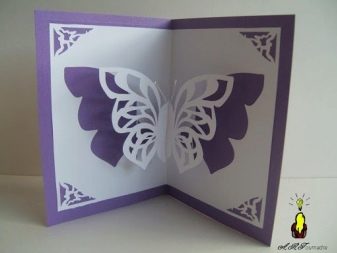
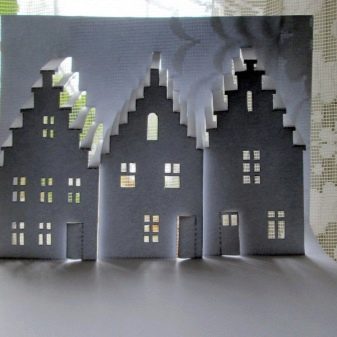
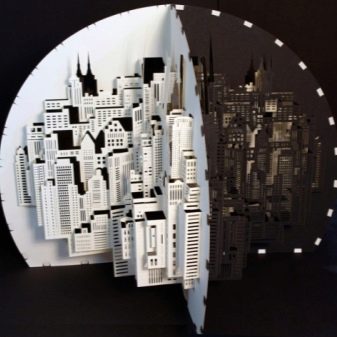
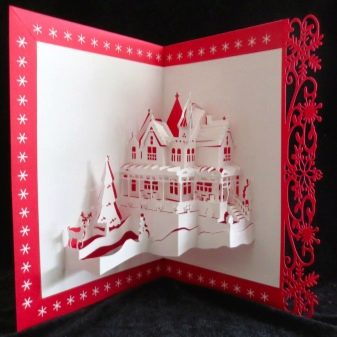
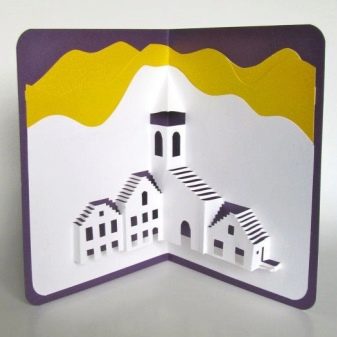
Volumetric crafts require much more care, experience and work. Reproduction of three-dimensional structures is not a task for a beginner, but if you follow the instructions, there is nothing impossible in this. You can recreate anything from the house to the castle or the most real historical or artistic scenes. The three-dimensional image is folded thanks to notches, bends and holes. The more complex the design, the more paper will be required in the process. But the result will really justify itself, such an article can be an interesting idea for a handmade gift for relatives and friends.
Schemes for beginners
You can understand how to make postcards using the Kirigami technique not only by attending a master class. The first thing that is required from the user is to prepare everything necessary for work and choose the appropriate template for manufacturing. As starting materials and tools, paper and scissors, and sometimes office knives, are suitable for more sophisticated work with small details.
The algorithm of work is simple.
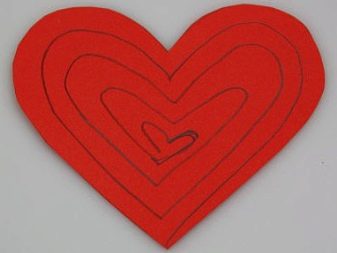
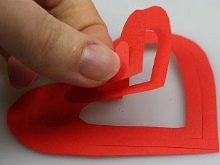
For example, to step by step to make a Valentine's Day holiday, the sequence of operations will be as follows.
- Calculate or redraw the template. The heart can be located on sheet A4 or A5, the main thing is that the paper is thick enough.
- According to the scheme, without getting over the edges, you can start cutting paper with an office knife or scissors. It all depends on the individual preferences of the user. The main thing is that as a result there are no rough or ragged edges.
- Cut small parts separately, fold the paper sheet.
- Inside, you can write both wishes and the name of the recipient. If there is no desire to color the card, you can immediately use colored paper or cardboard as a source material.
- Stretch the spiral of the heart and fold the figure, the middle part is attached to one of the halves of the heart, for the sake of volume, you can bend the figure out and get a three-dimensional Valentine.


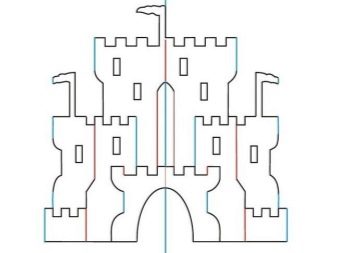
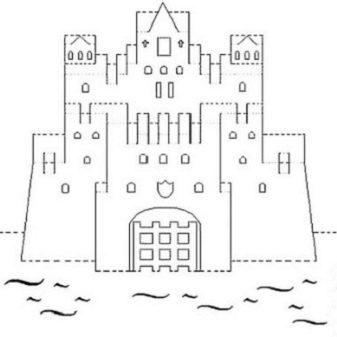
Thanks to the template, you can easily create a castle or a house out of paper. But scissors and other tools will need thinner ones to reproduce real paper architecture. For some things, you can even use a scalpel. Do not forget about safety regulations. For a castle or a house you will need:
- carefully draw the contours and details for the workpiece;
- trim all contours, starting from the top to the bottom;
- horizontal lines remain intact so that you can then easily fold the figure;
- towers and contours cut through gradually, work always goes from top to bottom;
- openings and other openings below are cut along the contour;
- windows are cut separately;
- bending of the workpiece goes from above and from the middle of the structure.
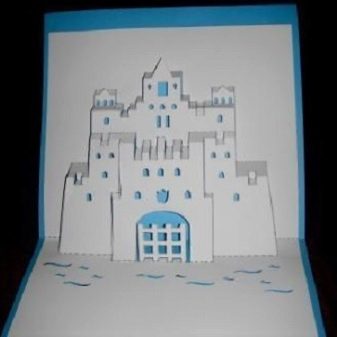
In more complex designs, even glue can be used. Sometimes it separately makes sense to prepare a background for the castle, so that the volume and detail of the figure look more impressive. The background is better to pick up color. It can be a panoramic picture with sunset, steppe or a real forest under the towers. Depending on the complexity, the speed of the work also changes, so in the process you need to be as careful as possible.
In order to freely create volumetric figures, it is recommended not to forget to use a special rubber substrate.
So much less risk of spoiling expensive furniture. When creating a hut or house with the help of Kirigami, you need to follow a few simple rules.
- You need to cut the paper from the top point, paying attention to all the internal details, descending to the lower edges at the very end.
- When working on a tile or roof, you will need to use a thinner blade to reproduce all the details.
- Carving wood, you can use different types of blades. This makes it possible to work with parts at an angle.Before this, the line is cut with a knife, and only then the tip of the scissors themselves is introduced. As the incision, the blades never connect to the end;
- Bends should only be started after all other parts have been cut. You need to bend the lines from the middle of the craft. A spatula or spatula will help to reproduce the curve of the tile.
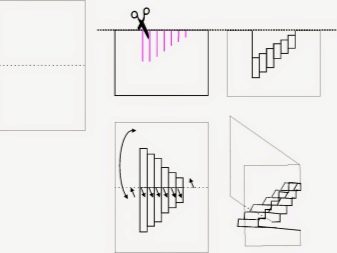
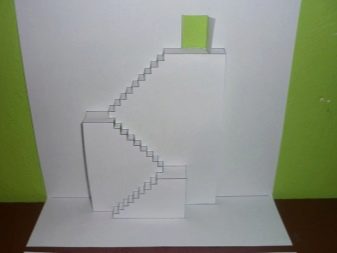
Another scheme for a novice master who seeks to master the art of Kirigami is a ladder. Here, the user will learn how to use several tools at once, including shovels, spatulas and a metal ruler. Instead of scissors, it’s more convenient for some to use a clerical knife. You can redraw any staircase diagram, but the most difficult thing is to reproduce the mirrored steps. The algorithm of actions is as follows:
- the lines are vertically cut with a knife;
- then, using a spatula and a spatula, bend the paper, reproducing internal and external folds - all this will require attentiveness and caution in the execution process.
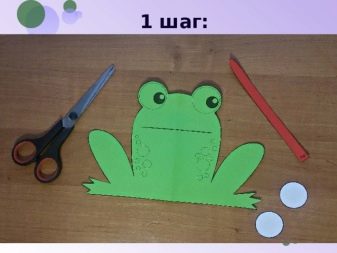
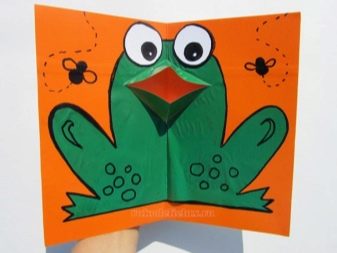
The frog is a classic figure for a beginner. It is ideal for children who are just starting to learn paper skills. The procedure is quite simple. In the process, you will need to use a quality glue stick that dries quickly and leaves no residue:
- fold a sheet of paper in half, the front side should be inside;
- You can draw a template, both in advance and immediately after;
- carefully cut the frog along the contour on both halves;
- make a small cut for a future mouth with a short movement and bend the corners of the paper;
- expand the frog, bend the edges and glue the edges with glue pencil.
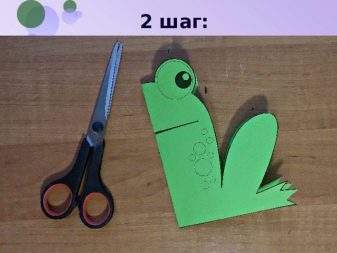
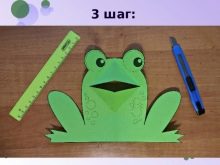
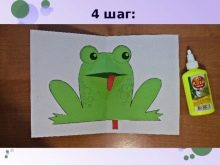
To give the figure a volume, it is enough to unscrew the corners of the paper on the left and on the right side.
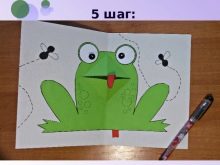
Eyes are either drawn or glued separately. The tongue is cut from another sheet of paper, most often the color is preferable red or pink. One end must be rounded, this can be done with glue. The width is selected so that it matches the proportion of the figure. The tongue adheres to the internal oral cavity separately. If a water lily or background is planned for a frog, then the basis can be prepared by bending the paper in the right direction. It can be blue or green-blue.
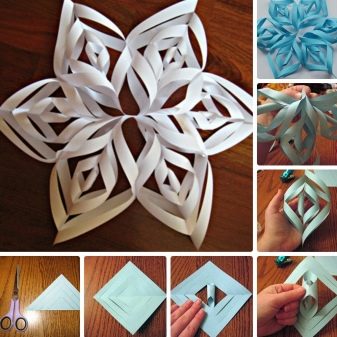
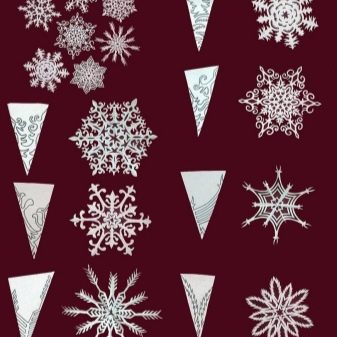
Snowflake for children on New Year's Day is simply cut along the contour with rather thin scissors. Most often, for a home or office, the basis of a snowflake is a regular A4 album sheet. The pattern and complexity of snowflakes can be any, at the discretion of the user. But everywhere it is better to be guided by the principle “from simple to complex”, this will make it possible to avoid mistakes and develop skills for hands on simpler designs. Then reproduction of complex products will not be any problems.
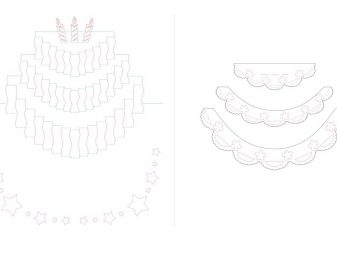
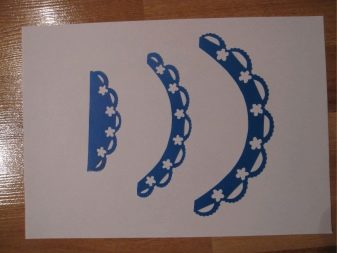
For instance, winter birthday cake, can be made of paper in the form of a card. One of the main steps is to outline clear contours for reproducing the workpiece. Three-dimensional design - properly folded paper. Bends can be marked not only with a dotted line, but also with color, starting from the middle. For example, the blue will be the folds inwards, and the red ones outwards. Empty fields and background around remain for wishes to the recipient of the postcard. If the cake is winter, then a deer can be shown there. Santa's deer and sleigh, for the winter theme, can be cut separately.


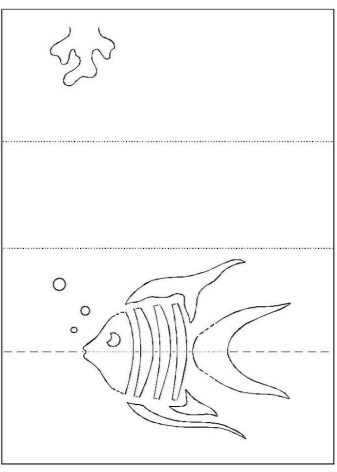
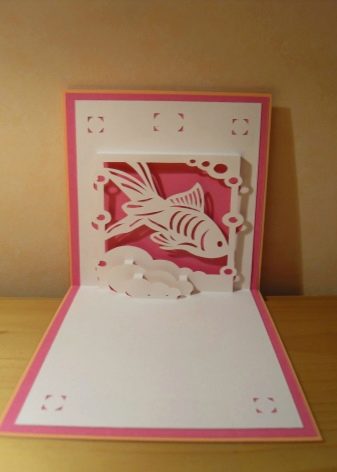
When cutting fish, you need to consider that the paper is divided into two main parts: background and the drawing of the fish itself. It is better to choose colors that are contrasting and not too “striking” in vision. Double-sided paper is best suited so that you don’t have to glue the craft. All solid lines need to be carefully cut, but if the fish has strips, then they can be left. The paper folds from the middle, and is glued together at the corners to prevent the figure from breaking apart.
To make a snowflake, you need to fold a square out of paper, sharp corners must be combined with each other.The result should be a small triangle or rectangle, which must be carefully cut without breaking the shape. Next, the figure is folded again, all sharp corners should clearly coincide with each other.
The base is leveled and smoothed, and then the snowflake itself is cut along the contour with small scissors.
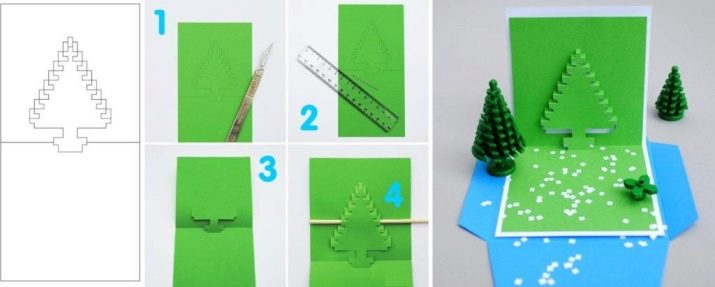
The Christmas tree is another symbol and an invariable attribute of New Year's decoration. Why buy a postcard if it can be made manually? You don’t even have to paint the finished product, it is enough to use paper or cardboard in different colors and shades. It is A4 cardboard that is best suited for this purpose, Christmas tree decorations can be either painted or glued. Rhinestones are suitable for garland.
The inner figure of the Christmas tree is cut with a knife strictly along the lines. Then comes the turn of the contour itself along the edges. Bends are best indicated by a dotted line. The outer fold serves as the basis for spruce, while the inner one reproduces it itself. The whole essence of the design is a neat fold and carefully drawn and cut details.
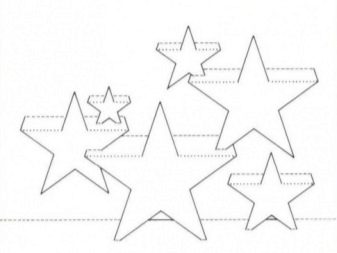
A traditional star or a swan on Victory Day is also not very difficult, just follow the chosen scheme. For small parts we use a clerical knife, and for carving along the contour - sharp scissors. It is fragments and patterns that are cut out in the first place and always from the center of the product. Go to the edges at the very end of the work. The rubber lining and paper vise will make it possible to work with the workpiece for a long time, and reduce the risk of spoiling it with inaccurate movement. It makes sense to purchase special knives for Kirigami, if the user has a desire to master this art professionally.

See how to make a voluminous postcard with your own hands Kirigami, see the next video.


